

How To Draw A Baby Goat
How to depict a baby hands and only in 3 step-by-step versions in this article! At beginning glance, information technology may seem that drawing a babe is elementary. Withal, practice shows that you need to beginning drawing newborns from abstract children's portraits and figures, having previously studied the proportions and memorized simple diagrams given in footstep-by-step lessons. Today, with the assistance of a detailed step-by-stride lesson, nosotros will learn how to draw a baby with a pencil.
The article describes the steps of building and creating a shadow. A portrait of a baby differs from an adult in its parameters. Optics and cheeks will be more expressive, and olfactory organ and lips – less. So, let's proceed to the drawing and find out how to draw a baby correctly.
Allow'southward try to describe a baby, even though this is not an easy task: the baby is ever on the move, and only experienced artists manage to draw them from life. Infants are a popular subject in art. This is explained by the power of babies to arouse admiration and affection in those who are watching them.
Let's draw such a nice baby here:
Baby drawing (Option 1)

The lying baby looks very cute. Let's try to make such a picture.
The baby lies on the scales. In a modest child, the ratio of the size of the head about the torso is much smaller than in an adult. Do not forget about it. Besides, you will need to accept into business relationship the beautiful infant swelling.
Get-go, draw a circle. On it, as well as in the previous master classes, we outline the part on which the little confront of the child will settle downward.

two. As we draw a reclining infant, marker the eyes, nose, and mouth on the left side of the circle. Do not forget the proportions.
3. Draw the outlines of the head around the hereafter face and mark the lower part of the surface on which the child lies. Allow it be, for case, children's scales.
four. Then you already know how – optics, olfactory organ, and oral fissure. Yes, still a little ear.
5. Now nosotros endeavour to depict a body step by step. First, marker them with unproblematic lines – how are the artillery, legs, and torso. Since the baby is quite pocket-sized, his neck is entirely invisible.

6. Then describe the breast and pens. More roundness, on the wrist, you can describe a fold.

seven. Next, a line of beautiful plump legs.


8. At present describe the contours of children's scales.

9.The resulting design can exist shaded, shaded and painted.
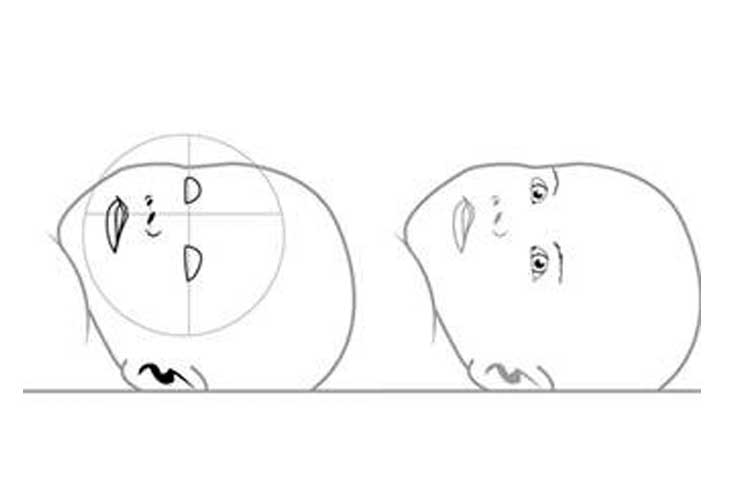
How to describe a baby (Option 2)
The finished drawing can exist presented to a immature female parent, who has her fidget and a rogue.
We put on the sail the original lines: a circumvolve, which will and so become the head of the baby, having slightly moved away from the band, nosotros draw two arched lines – the shoulders, marker the trunk and the arms with lines. Inside the circle, we depict two parallel lines, which are crossed by the 3rd line in the heart.

Describe the original contours
Stepping back from the circle, we specify the shape of the caput: the upper function will be broad and rounded; the lower role will narrow in the cheek surface area. We denote the modest dash beneath the mentum of the child.

We specify the contour of the head
We drew parallel lines inside the circle for a reason: they are necessary for the symmetrical organisation of the eyes, olfactory organ, lips. Describe on both sides of the center line large baby oval eyes. Arcuate strokes denote the lower eyelids. Doris on the upper eyelids long curved eyelashes.

Nosotros draw eyes of the kid
We bring pupils, leaving white round glares in them.

Nosotros describe pupils
On the line of the circle, nosotros will draw 2 curved lines. It will exist surprised raised to the edge of the baby. We draw a tiny nose on the lower vertical line. We terminate the mischievous smile.

We end the edge, nose, and oral cavity
From the lower profile of the cheek, we draw downwardly a curved line, denoting the shapes of the tummy and panties, which bristle upwards.

Draw a line of the stomach
We draw hands of the kid with short fingers spread. The main thing is to make them look plump, like those of newborn babies.
Nosotros specify the contours of the baby'south feet, calculation to it the fingers on each foot and the heel on the left leg.

Nosotros specify the contours of the legs
We describe on the pinnacle of a few funny protruding hairs and add ears. They are almost invisible behind wide-spread artillery, only we demand to outline their contours and internal lines.

Draw sticking hairs
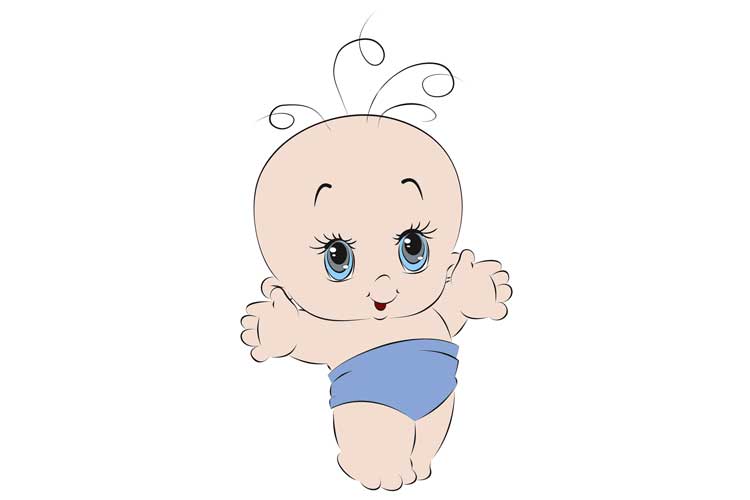
Decorate our phenomenon with pink. Brand the eyes of the infant heaven blue and the panties bluish.

Information technology remains to decorate the baby
Babe cartoon ( Selection 3)

How to draw a baby with a pencil
Tools and materials:
White canvas of newspaper;
Pencils (hard and soft);
Eraser.
Stages of piece of work:
Photo 1. At the first stage, using a simple pencil, sketch a rectangle without using rulers. Making a drawing past hand:

Photo 2. We calculate the size of our form. The pinnacle of the rectangle should fit a width of one and a half times, which ways one and a half of the summit. If everything fits in size, you tin can move on to the side by side detail. But it is worth taking the size responsibly because if they are not calculated correctly, the drawing will non work out right and beautiful. So double-bank check:

Photo 3. Our rectangle we will use equally the basis for the face. Superlative depict a slightly rounded upwards line. The right side volition exist located lower than the left:

Photo four. Use the eraser to remove the upper horizontal line of the rectangle. Lower round corners:

Photo 5. Doris you on summit of a similar curved line. We make a notch for the cheeks:

Picture 6. Now nosotros will build for the eyes. From the border to the left and the correct, we recede a floor of a centimeter and divide the segment into equal three parts. From the heart section, we drop downwards two lines, which will slightly diverge towards the bottom. At the bottom, we define the mentum and make it rounded. The olfactory organ will exist located in the middle of the confront, and from nose to chin, we make a notch for the mouth:

Photo 7. Add large oval optics. To the edge, they will be more than pointed. On the nose, add holes. We can make the cheeks more "loose," round them up:

Photo 8. Add a cap image. It volition exist cartoon a bear and his ear on the right. Bends and small folds will exist visible on the cap. On the left, check the vertical line. Detailing slightly line collar sweaters. There will be several of them. Do non spend as well much attending to dress. The main task for the portrait is the face:

Photo nine. Nosotros define the darkest places and hatch them. Take the eyes, the openings of the olfactory organ, the lines of the mouth, and the background to the left. A little direct outline of the face up. It is worth remembering that its smooth lines distinguish the front of the infant. Above the eyes, we describe the eyelids with a thin line:

Photo ten. Determine the main direction and location of the shadow. The low-cal will autumn from the meridian correct, which means the shadow will exist located on the left. Take hold of the forehead, neck, left the side of the nose, cheeks, and chin:

Photo 11. Now using the shadow create a face shape. Information technology is important to remember that the direction of the strokes helps to create volume. Add together a shadow near the optics, frontal office, and olfactory organ. But on the cheeks it is not worth much to lay shadows, because they stick out a little and receive a large amount of calorie-free:

Photograph 12. Add strokes to the cap and eyelet. In parallel, we are working on the facial features and shadow on it:

Photo 13. We go along to piece of work on the book. At this phase, nosotros will be able to prescribe wearable slightly, revealing folds on information technology:

Photo xiv. We take a soft, simple pencil and add contrast. We pay special attention to the optics, nose, and neck. Lips will be slightly compressed; it tin be seen in the folds around them:

Photo 15. Make the strokes softer and then that the cartoon was more than real:

Photo 16. Add contrast once again. Allow's expect at the picture equally a whole and refine the missing stages. Figure completed:
So nosotros learned to draw a child in pencil in stages. Equally you can run into, drawing a kid is uncomplicated, and now y'all tin can repeat this lesson yourself. At the initial stage, I recommend to echo the portrait of the child fatigued in this article and then endeavour to draw your baby or the baby of your relatives or acquaintances smile

Source: https://drawnbyhislight.com/how-to-draw-a-baby
Posted by: clarklects1948.blogspot.com
0 Response to "How To Draw A Baby Goat"
Post a Comment